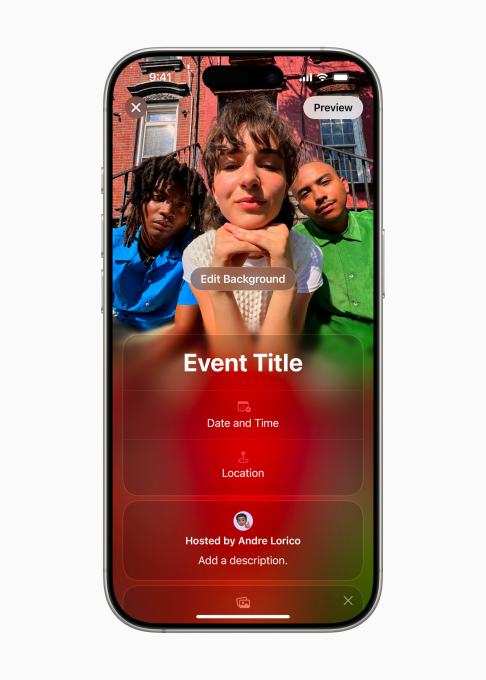
Introduction to Apple’s Invites App
Apple has launched a new application called Invites, designed to simplify the process of creating custom invitations for events. You can use the Invites app on your iPhone or access it through the web. This new addition allows users to create personalized invitations, RSVP to events, contribute to shared albums, and even set up playlists for event soundtracks.
Invites serves as Apple’s answer to Partiful, a well-known app for event invitations that received recognition as Google’s Best App of 2024. While Apple’s Invites requires an iCloud+ subscription for creating events, anyone can respond to invitations without needing an Apple account or device.
This guide will help you navigate the process of setting up an event, sharing albums or playlists, and sending your invites to guests.
Creating an Event Invite
To create an event invite using Apple Invites, follow these steps:
-
Accessing the App:
- On your iPhone, open the Invites app.
- If you’re using a computer, visit iCloud.com and locate the Invites section.
-
Starting a New Event:
- Tap the plus sign in the app or select “New Event” if you are on the web.
-
Choosing a Background:
- Look for the “Add Background” option.
- Select the “Photos” to pick an image from your library or tap “Camera” to take a fresh photo.
- You may also choose from Apple’s selection of backgrounds or create your design using the Image Playground, requiring a compatible iPhone model.
-
Event Details:
- Enter your event title and pick a font style.
- Set the date and time. You can mark it as an all-day event, and Apple will include the weather forecast for that day.
-
Location:
- Search for a venue or use a suggested location. You can name the location anything you prefer, and Apple Maps details will be included automatically.
-
Description:
- Write a brief description of your event. You can use Apple Intelligence’s Writing Tools for help, provided your device is compatible.
- Previewing Your Invite:
- Before finalizing, tap “Preview” to see how the invite will look.
Adding Shared Albums and Playlists
Beyond the basics of creating an event, Apple provides features to enhance your invitations:
-
Creating a Shared Album:
- This allows attendees to add photos and videos from the event.
- Tap “Create Album,” where the album will be named after your event by default, but you can modify it if desired.
- Setting Up a Playlist:
- You can make a shared playlist by selecting the “Add Playlist” feature. Attendees can contribute songs before or during the event.
- An Apple Music subscription is needed for this feature. The playlist will also default to your event name.
Inviting Guests to Your Event
Once your event is set up, it’s time to send out your invitations. Here’s how to do it:
-
Invite Options:
- You have two main ways to invite guests: share a public link or send personal invitations through your contacts.
-
Sharing the Invite:
- Click on “Invite Guests” to start the process. Depending on your choice, you can use Messages or Mail apps to send a public link or use the share feature to distribute the invite across various apps.
-
Selecting Contacts:
- If inviting specific individuals, tap “Choose a Guest,” find the person’s name, and share the invite link with them.
- Sending Notes to Guests:
- After sending your invites, you have the option to communicate updates. For instance, if the location changes or if you want to remind guests to bring something specific.
- Select your event and tap “Send a Note” to write and distribute your message.
Conclusion
Apple’s Invites app makes it easier than ever to create and manage invitations for any event. With features like shared albums and playlists, it enhances the guest experience from the moment they receive their invite. Whether you are planning a birthday party, a wedding, or a casual get-together, Invites offers a streamlined process to ensure you can focus on enjoying your event rather than stressing over the details.
